 I found out every house has to have an electrical cutoff box at the house. I installed it to an eight foot treated post buried close to five feet in the ground. I installed two grounding rods, one for this box, and one for the main panel in the house.
Friday, June 12, 2009
Electrical power to the house. June 2, 2009
I found out every house has to have an electrical cutoff box at the house. I installed it to an eight foot treated post buried close to five feet in the ground. I installed two grounding rods, one for this box, and one for the main panel in the house.
Tuesday, June 9, 2009
Team Anderson Shirts


My lovely daughters designed a t-shirt for the log cabin journey. Don't be jealous, you too can order one for around twenty dollars. The front of the shirt says "We've Got Cabin Fever... Butte Montana Summer '09" and the back says Team Anderson 09.
Monday, June 8, 2009
We have running water! June 2 2009
 I plumbed in the water pressure tank, hung the control box on the wall and finished wiring in the water pump. I left the faucet at the well head open with 100 feet of hose hooked to it to flush the system before it went into the house. I thought it was a good plan! I learned that I need to make sure all valves are turned off inside the basement before I go to see if water is coming out at the well. We have good water pressure, water was flying about a third of the way across the basement floor. I did need to test the floor drain at some point anyway. It worked great!
Tomorrow I plan to head back to the mountains and cut some more logs. We will also get logs suitable for building a peeling rack. Thursday it is supposed to rain, so I will install the water heater and the water manifolds.
June 2 2009

I finished the wiring from the house to the meter today. I set up the wiring to the garage and and just folded the cable over inside the meter panel. When the garage is finished, I'll install a 100 amp breaker at the meter and hook the wiring to it.
First Logs. June 1 2009

These are the first 8 logs on property. Myles and I cut 12 logs on Saturday and hauled 8 of them on Sunday. We hit a snag while we were dragging them out of the woods. I buried the tractor up to the axles in mud. Red Wrecker pulled us out with a one ton truck using the towing winch. He lifted the front end of the truck completely off the ground several times in the process!
I have to get one more load of smaller logs to use in building the peeling racks before I can start installing logs.
I have to get extensions for the anchor bolts coming out of the poured walls so they pass completely through the sill logs to properly bolt them to the top of the walls.
I finished up the house wiring at the cut off box by the house, and in the main panel in the basement today. I wired in a circuit for a GFCI outlet by the main panel, and one in the ceiling of the mechanical room, then I hung a 48 inch florescent light in the mechanical room for temporary lighting. All I have left to do to get electricity to the house is hook it up at the meter. It was raining today, so I'll finish this in the morning. No more 200 feet of extension cords!
I started installing the pressure tank for the water, and found out I was missing some important parts. I picked them up today, and I will finish installing the system and wiring it to the main breaker panel in the morning. We will have running water tomorrow. I'll run the water from the frost free faucet at the well casing for an hour to flush out the system. The next step is to install the water heater and assemble the manifolds for the cold water and the hot water, and mount them to the wall. All waterlines, hot and cold, will run directly from the hot or cold manifold.
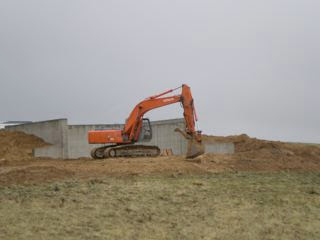
We have the lifting power now! May 31 2009

Here is the forklift I will use to build the house and garage. It has a boom that extends to 42 feet with a 6,000 pound capacity; it will allow me to install all logs, even the ridgepole and purlins. I will build a 4 foot by 10 foot basket out of steel that can be bolted to the forks. It will be used to install the roof joists, decking, roof paper and roof metal, as well as a platform to work from while framing in, and sheeting the roof gables.
Cut off box for electricity, May 31 2009

I installed the electrical cut off, per code, for the main power to the house last Thursday evening, and finished burying the wires. I have about an hour's worth of work to complete to get the power turned on to the main panel in the basement. I'll pick up the last few parts I need to do this on Monday morning.
Cement slab for garage, May 31 2009

We poured the slab for the garage this week. The next day it was saw cut to control cracking.
Daylight wall framed in with windows, May 31 2009
 Installed the basement windows last Tuesday. Will order the double doors for the basement Monday morning. Later this season, or maybe next year, we will attach mesh to this wall, and face it with stone harvested from the mountains above Melrose.
May 31 2009

I installed the 2 X 10's on the top of the basement walls, drilling holes for all the anchor bolts, and screwing them to the ends of the floor joists. The first logs (sill logs) will also be drilled and be centered on top of these 2 X 10's. We cut down the first 12 trees today. We will haul them to our property tomorrow. (top)
We framed in the mechanical room in the basement. Need to install sheetrock, then we can install the door. (bottom)
Basement interior, May 18 2009

The basement ceiling in flat with the floor joists level with the main beam.
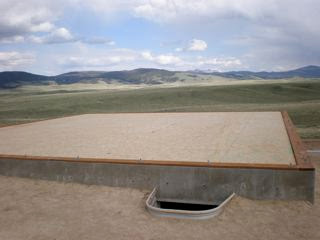
Main floor decking completed, May 18 2009

We finished decking the basement today. The only thing left to do is install the 2" X 10" green board around the perimeter, on top of the cement walls. The next step is cut some logs.
We dug the trenches and buried the electrical cables to the house from the meter, and to the garage from the meter.
Framing daylight end and installed main beam, May 16 2009


Working with a very good carpenter the last two days, we framed and sheeted the daylight wall, and set main beam in place on three posts and leveled it with the top of the basement walls. We installed all the floor joist hangers to the main beam before we set it in place. On Monday we will install the floor joists and the main floor decking. We will also install 2" X 10" green board around the entire top perimeter. Then we will be ready to put the first logs on the walls. We will be digging the trench for the main electrical feed to the house next week, and installing a 200 amp panel in the mechanical room in the basement. I will then install the water pressure tank, and hook the well pump up to the electrical panel. Running water and hot showers are getting very close!
Basement cement work completed, May 12 2009
 Here is a little better view of the retaining walls. They are angled out slightly and tapered from four feet high at the basement walls to three feet at the ends. We will get a Bobcat out to level all the dirt around the basement, possibly later this week when we install the septic system.
I have a carpenter set up to help me frame up the daylight end and sheet it with OSB, install the main beam, posts, and floor joists, and deck the main floor. We will also frame in the mechanical room. We plan to do it this coming Sunday.
May 12 2009

Here is the basement when all cement work has been completed.
We finished running the water line and electrical wires from the well through a hole that was engineered in the wall going into the mechanical room about a foot above the floor. There is also a hole about four feet above that for the main house electrical feed to come into the basement in the mechanical room. I stripped the forms off the retaining walls while Jim back filled the walls. We installed the escape chute, window well.... (Can't remember exactly what they called it) for the basement window that you can see at the left rear wall. The inside of the chute that goes up to ground level from this window is painted to look like granite. It was simple to install and very sturdy. I will install the window after the main floor deck is completed. There is a steel ladder that will hang in the well in case of an emergency. This meets all codes in case we every decide to put a bedroom in the basement.
Finish work on basement floor, May 11 2009

Here is Steve using a motorized tool to finish the surface of the floor in the afternoon of the day we poured it. You can see the mechanical room area in the rear, right hand side of the basement. The in-floor heating manifolds are mounted on the wall. The white pipes in front of the in-floor heat manifolds are for the basement bathroom, pipes that will go to the main floor bathroom, and the vent pipes that will extend up through the roof.
Pouring basement floor, May 11 2009

We poured the basement floor and the two retaining walls. The under floor heating tubes still held pressure when we were done. (It was a good day)
View from 9,800 feet above sea level, May 9 2009

I went snowmobiling with my cousin last Sunday.
Here is a picture I took at 9,800 foot of elevation. It was a beautiful view. It started to snow right after I took this photo.
In floor heating tubes installed, May 9 2009
 Here is the basement floor we prepared today. We laid out the e-foil on the floor, then covered it with 4" X 8" sheets of re-mesh. (Steel grid) We wired the sheets of re-mesh together, then we ran the 5 heating zones and tied the plastic pipes to the re-mesh with cable ties every two feet. I hooked each zone to the manifolds as we laid them out. Once this was all done, we used my air compressor and put 90 pounds of pressure into the system. I will check it tomorrow to make sure it holds pressure. We will keep pressure on the system while we pour the basement floor. The plan is to pour the floor and the retaining walls on Monday, strip the retaining walls on Tuesday, and then backfill the foundation. My cousin wants to get the excavator off our property for other jobs, so we will probably put in the septic tank and drain fields next week also. After this, I will hire someone to help me frame up the daylight wall, install the main beam and the floor joists, and deck the main floor.
Then I can start putting logs up!
Update, May 5 2009
A Quick Update
We finished roughing in the plumbing in the basement floor on Saturday. I hired a plumber as a consultant to show me how to do it. In Montana, if I do the work myself, I don't need a permit, and there are no required inspections. (The consultant is a certified plumber so it is all completed pre code. (Dimensions, clearances, pressure tested, venting, etc.) This week we poured the footings for the retaining walls on both ends of the daylight basement, and footings,pads where the roof logs will be supported. We also poured footings in one corner of the basement where the chimney will go. We built the forms for the retaining walls today.
I cleaned up the brick ledge on the top of both long walls. This is where the floor joists (TGIs) will sit. The next steps, which I will be doing myself, are to lay e-foil in for the basement floor, then lay in 4' by 8' sheets of steel remesh. I will then attach the PEX (under floor heating tubes) to the remesh with tie wraps every 2 feet. I have 5 zones with 250 feet per zone. Then I will install the manifolds (which I assembled and soldered up last week) to the basement walls, hook up the tubing and pressure test the system before we pour the floor, and continue the pressure test while the floor is being poured. It is supposed to rain tonight and tomorrow. I am hoping to get the floor poured this week if possible, so I can start framing in the daylight wall, and install the main beam, the floor joists and the first floor decking. I would like to start putting logs on the walls before the 25th of this month.
No pictures this time.
Basement walls finished, May 1 2009
 The basement walls are finished. Today we worked at roughing in the plumbing in the basement floor. Tomorrow we will pressure test the pipes and install the traps for the drain and basement stool. Monday, I will lay in the e-foil vapor/heat barrier, then lay the steel mesh.
I then have to attach the flexible pipes to the mesh with quick ties every two feet. This will take a while as there are 5 zones of 250 feet of pipe per zone. We will probable pour the floor Tuesday or Wednesday. Then I will be framing in the end wall and putting in the main beam, the TGIs, and decking to first floor. I'll then run 2" by 10" green board around the top of the walls, drilling holes for the anchor bolts and making sure they are parallel and square. Then I can start putting logs on the wall.
Now if I can just find my logs!
Pouring basement walls, May 1 2009

Here they are pouring the basement walls. That's my cousin, Jim, by the cement truck.
Fishing break, May 1 2009

This is me working on the log cabin. It's hard, dusty, sweaty work, but I can take it!
Building forms for basement walls, April 13 2009

We will continue building the forms tomorrow and pour the walls this week. We had a plumber come out today and tell us where to excavate for to pipes going out of the house to the septic tank. I will help him rough it in before we pour the basement slab, which will be next week. I'll be installing radiant heat under the slab. I'll install the tubing, then they will pour the floor.
Building forms for basement walls 1, April 8 2009

Here is a picture of the basement wall frames going up. They will finish the forms by Friday, get inspected next week, then they will pour the walls.

Subscribe to:
Posts (Atom)


